America 250 Years
Space Shuttle Dot to Dot — Free 50-Dot Printable for Ages 5–7
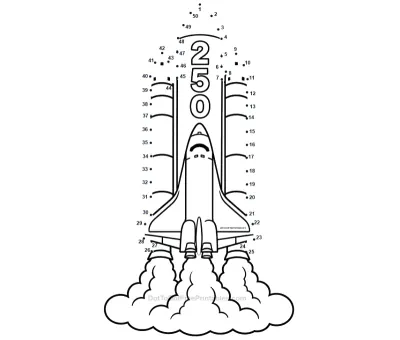
Connect 50 easy dots to reveal a mighty Space Shuttle blasting off to celebrate America's 250th anniversary! This free printable worksheet helps young children practise number sequencing and pencil control while honouring 250 years of American exploration and innovation. Perfect for ages 5–7.
Difficulty
Easy
Fun fact: NASA's Space Shuttle programme flew 135 missions between 1981 and 2011, carrying astronauts, satellites, and the building blocks of the International Space Station into orbit. The five shuttles — Columbia, Challenger, Discovery, Atlantis, and Endeavour — logged more than 1,300 days in space combined.
Downloaded1+timesYou’ve made a great choice!
Downloads now start from the button below. Tap it to get this puzzle's PDF.
Number Version
Connect the numbered dots from 1 to the end to reveal the picture.
Free for home and classroom use.
Alphabet Version
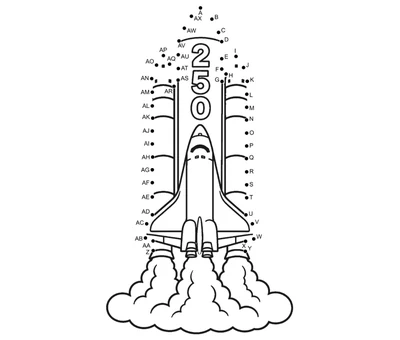
Includes alphabet-themed design for easy learning.
No sign-up needed. Opens as a PDF. Print on US Letter (8.5 × 11 inch) or A4 paper. Free for home and classroom use.
America 250 Years
You might also like
Ages 5–7 — Easy
How to Solve the America 250 Space Shuttle Dot-to-Dot Puzzle
America is turning 250 years old — and few machines embody the nation's spirit of exploration and ambition better than the Space Shuttle! For 30 years, the Shuttle carried American astronauts to orbit, launched telescopes that changed our view of the universe, and helped build a space station shared with the world. Grab a pencil, find dot 1, and let's send this Shuttle soaring!
1–10 — The Nose Cone and Cockpit
Start at dot 1 and connect through to dot 10 to trace the sharp nose cone and the row of cockpit windows just below it. These precise, angular strokes make a great warm-up for young artists, helping them build the steady hand control they will need for the wings and engines ahead.
Fun fact!
The Space Shuttle's underside and much of its body were covered in thousands of heat-shield tiles, each made from a silica material so effective that you could hold a tile in your bare hand seconds after it had been heated to 2,300 degrees Fahrenheit — the temperature it reached during re-entry.
The Space Shuttle's underside and much of its body were covered in thousands of heat-shield tiles, each made from a silica material so effective that you could hold a tile in your bare hand seconds after it had been heated to 2,300 degrees Fahrenheit — the temperature it reached during re-entry.
11–24 — The Main Fuselage
Continue from dot 11 to dot 24 to draw the long, cylindrical body of the orbiter — the part that carried the crew cabin, payload bay, and all the mission equipment. Children practise straight, parallel lines here, which builds excellent consistency and helps them understand the overall shape before adding the exciting details around it.
Fun fact!
The Shuttle's enormous payload bay — the cargo area behind the crew cabin — was 60 feet long and 15 feet wide, big enough to carry a school bus into orbit. It was used to deploy satellites, carry science experiments, and ferry the massive modules that were bolted together to build the International Space Station.
The Shuttle's enormous payload bay — the cargo area behind the crew cabin — was 60 feet long and 15 feet wide, big enough to carry a school bus into orbit. It was used to deploy satellites, carry science experiments, and ferry the massive modules that were bolted together to build the International Space Station.
25–36 — The Delta Wings
Trace dots 25 through 36 to draw the Shuttle's distinctive swept-back delta wings. These long, diagonal strokes are a wonderful exercise in confident line control — children practise drawing from a wide wingtip back toward the body of the orbiter in one smooth, deliberate movement.
Fun fact!
The Space Shuttle was the world's first reusable spacecraft designed to fly like a glider during landing. After re-entering the atmosphere, it had no engine power and only one chance to land — pilots called it "the world's heaviest glider." The delta-shaped wings gave it the lift it needed to glide safely onto the runway.
The Space Shuttle was the world's first reusable spacecraft designed to fly like a glider during landing. After re-entering the atmosphere, it had no engine power and only one chance to land — pilots called it "the world's heaviest glider." The delta-shaped wings gave it the lift it needed to glide safely onto the runway.
37–44 — The Tail Fin and Main Engines
Connect dots 37 through 44 to draw the tall vertical tail fin and the cluster of three main engines at the back of the orbiter. Children practise a tall upward stroke for the fin and then smaller, rounded shapes for each engine bell — a great mix of large and small movements in the same section.
Fun fact!
Each Space Shuttle Main Engine (SSME) was one of the most powerful rocket engines ever built, generating hundreds of thousands of pounds of thrust. The three engines burned liquid hydrogen and liquid oxygen together, producing a flame so hot and loud that water was poured onto the launch pad to soften the sound of lift-off.
Each Space Shuttle Main Engine (SSME) was one of the most powerful rocket engines ever built, generating hundreds of thousands of pounds of thrust. The three engines burned liquid hydrogen and liquid oxygen together, producing a flame so hot and loud that water was poured onto the launch pad to soften the sound of lift-off.
45–50 — The Mission Patch and Finishing Touches
Finish the puzzle by connecting dots 45 through 50 to add the American flag, mission patch, and the final details that bring the whole Shuttle to life. Just six dots to complete this historic spacecraft — encourage children to make these last lines their neatest and most precise for a picture worthy of a mission patch!
Fun fact!
Every Space Shuttle mission had its own unique crew patch, designed by the astronauts themselves and worn on their flight suits. These circular patches featured artwork, the crew's names, and symbols representing the mission's goals — and they became treasured collectibles for space enthusiasts around the world.
Every Space Shuttle mission had its own unique crew patch, designed by the astronauts themselves and worn on their flight suits. These circular patches featured artwork, the crew's names, and symbols representing the mission's goals — and they became treasured collectibles for space enthusiasts around the world.
Incredible work — your America 250 Space Shuttle is cleared for launch! That's 50 dots and one magnificent symbol of American ingenuity and exploration. Colour the orbiter white with black heat tiles, add red and blue flag markings, and your Shuttle is ready to blast off into the history books. Happy 250th birthday, USA — the sky is definitely not the limit! Discover more america 250 printables to keep the celebration going.
Coloring Guide
America 250 Space Shuttle: Classic Real-Life Colors
The real orbiter is white with black nose and wing tiles; this palette adds the red and blue of its flag markings.
| Dot Range | Part | Color | Why this color | |
|---|---|---|---|---|
| Numeric | Alphabet | |||
| 1–10 | A–J | The Nose Cone and Cockpit | Crayola Scarlet | The black nose took the worst of the re-entry heat; red outlines it against the white body. |
| 11–24 | K–X | The Main Fuselage | Crayola Sky Blue | The long fuselage held a payload bay big enough for a school bus; the orbiter is really white, so blue shows the shape. |
| 25–36 | Y–AJ | The Delta Wings | Crayola Goldenrod | The swept delta wings let the engineless orbiter glide home; gold catches their broad upper surface. |
| 37–44 | AK–AR | The Tail Fin and Main Engines | Crayola Scarlet | The three main engines each made hundreds of thousands of pounds of thrust; red picks out the tail cluster. |
| 45–50 | AS–AX | The Mission Patch and Finishing Touches | Crayola Sky Blue | Every crew designed its own round mission patch; blue is a common patch background colour. |
America 250 Space Shuttle: Soft Natural Colors
Bright sunlight in orbit turns the white orbiter to hard silver-grey with faint coloured markings.
| Dot Range | Part | Color | Why this color | |
|---|---|---|---|---|
| Numeric | Alphabet | |||
| 1–10 | A–J | The Nose Cone and Cockpit | Crayola Silver | The nose catches full sun as a bright silver highlight above the dark tile line. |
| 11–24 | K–X | The Main Fuselage | Crayola Tan | Scuffing and heat staining give the pale fuselage a warm off-white, near tan. |
| 25–36 | Y–AJ | The Delta Wings | Crayola Sea Green | Soft green suits the shaded underside of the delta wings in orbit. |
| 37–44 | AK–AR | The Tail Fin and Main Engines | Crayola Silver | The tall tail fin reflects the same silvery glare as the rest of the sunlit hull. |
| 45–50 | AS–AX | The Mission Patch and Finishing Touches | Crayola Tan | A cloth mission patch in strong sun looks pale and faded rather than boldly coloured. |
America 250 Space Shuttle: Bold Real-Life Colors
Deeper tones bring out the Shuttle as scorched, reusable hardware - heat tiles, soot and rocket-blackened engine bells.
| Dot Range | Part | Color | Why this color | |
|---|---|---|---|---|
| Numeric | Alphabet | |||
| 1–10 | A–J | The Nose Cone and Cockpit | Crayola Forest Green | Dark green stands in for the heat-resistant black nose. |
| 11–24 | K–X | The Main Fuselage | Crayola Brown | Brown reads like the heat-staining that streaked the fuselage after each flight. |
| 25–36 | Y–AJ | The Delta Wings | Crayola Orange | Burnt orange suits wing edges that glowed during the fierce heat of re-entry. |
| 37–44 | AK–AR | The Tail Fin and Main Engines | Crayola Forest Green | Strong green gives the engine bells the look of metal fired again and again. |
| 45–50 | AS–AX | The Mission Patch and Finishing Touches | Crayola Brown | Deep brown fits a well-handled mission patch stitched onto a flown flight suit. |
Why Is the America 250 Space Shuttle Dot to Dot Printable Rated Easy?
The America 250 Space Shuttle is rated easy. Of its 50 dots, 33 run in straight lines, with 4 curved, 7 zigzag and 6 sharp-turn dots. The stretch to slow down for is delta wings at dots 25–26. Follow the numbered order even when another dot looks nearer, and check the next number before each turn.
Straight
33 dots · 66%
Easiest — join two dots with one straight pencil stroke.
Curved
4 dots · 8%
A gentle bend, so the pencil has to slow down and steer.
Zigzag
7 dots · 14%
Quick in-and-out changes of direction. Good counting practice.
Sharp turns
6 dots · 12%
25 26
We traced all 50 dots on this exact worksheet by hand — the sharp turns at dots 25–26 is where it got tricky, and you can check that against your own printout.
Key Sections to Know
Every notable stretch of the path, dot by dot.
| Dot Range | Pattern | Why It Matters | |
|---|---|---|---|
| Numeric | Alphabet | ||
| 25 26 | Y Z | Sharp turns | Expect an abrupt turn on delta wings between dots 25 and 26, so pause before joining them. |
Bottom line: The America 250 Space Shuttle dot to dot is easy rated — 74% smooth lines with just 1 short section to watch for.